Recall in my earlier pizza article that I usually make pizza without red sauce and without meat?
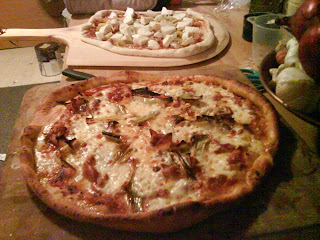
Well, I went ahead and tossed those rules out and made a pair of pizzas with a red sauce made from sweet heirloom tomatoes. To top the pies, I went with leeks, and paired with that was pancetta, which is a higher quality of cured pork belly very similar to bacon:
The sauce was very easy. Basically, I crushed and minced four cloves of garlic, added two tablespoons of olive oil to a two quart pot, and let the garlic fry for a little on medium heat. I roughly cut up the heirloom tomatoes and added them to the pot with a cup of dry white wine, and brought that up to a boil for a bit to reduce the alcohol out. Once that was done, I put a teaspoon of dried basil, a teaspoon of dried oregano, a teaspoon of salt, and a teaspoon of sugar in the mix, and topped it off with a bay leaf, and left it to simmer on a very low heat for 45 minutes.
While that was simmering, I worked together a crust. It was similar to the one I made before, but with semolina flour instead of whole wheat in a 1:2 ratio to all purpose. Instead of rosemary, I worked in oregano to give it a rustic taste.
While that was resting, I preheated my pizza stone to 500 degrees. I took out a skillet and fried up the pancetta pieces (You can get pancetta either rolled or in strips. The stuff I used was rolled) about halfway done, so that it would be able to fully cook in the oven. I set the pancetta aside, reserved the fat in the pan, and then washed and chopped my leek into strips about two inches long. With the reserved pancetta fat, I cooked down the leeks until they were very tender and separated, and set those aside as well.
When the dough was ready, I punched that down, divided it in half, and worked each piece at a time to make a wide crust. I eased that onto my peel, which had corn meal sprinkled on it. Then I spooned the sauce on the crust, spreading it evenly, then added one and a half cubed balls of mozzarella di bufala, along with my leek pieces and torn bits of pancetta. Then, it was oven time! Ten minutes of a roaring oven (approximately) and it was done.
The sweet in the sauce and the leek paired with the salty pancetta really nicely. This wasn't red sauce and meat for the sake of each. They paired well. That should be the reason you put anything together. Not because "thats how its always done" but because it tastes right. If I were making pizza margherita, I'd use a red sauce with that too, because the entire point is to celebrate the interaction of tomato and basil. So yes, rules can be broken, but be a dear and have a reason for breaking them.
A little place for me to rattle on about cooking. Whether it's to talk about what I'm cooking, what I want to cook, what other people cook, or life experiences shared over food, I hope to share what I have with you, and I hope to learn a lot in the process.
Sunday, December 14, 2008
That elusive Japanese fried rice
I'm assuming that everybody reading this has been to a Japanese steakhouse, griddlehouse, whateva, before. Those places where you sit around the chef, who's working on an enormous hibachi, and serves piping hot food directly onto your plate. Got it? Good. So, here's my quandry: I have absolutely no idea how they make their rice so good.
Fried rice seems like it would be positively a no brainer to crank out. It's rice, a few other things, and you cook it on a griddle. I mean, we all watch the guy do it. White rice, peas, diced carrots, a bit of pulverized fried egg, some soy sauce, sesame seeds, and butter. Now, try it yourself. I guarantee you it won't taste the same. Ever since I started cooking for myself, I've tried to make this dish, and while what I make might be tasty, it just doesn't compare at all. I tried again the other day, and while I got closer than I've ever gotten before, I still failed:
My mom gave me a cast iron griddle that fits over stove eyes, and it's awesome for cooking in this style, so I not only did the fried rice, but also some teriyaki shrimp and some broccoli, onion, and mushroom to go along. Don't get me wrong, it all tasted great, but the rice was off. It's not quite the same taste.
Now, what I did was to cook rice the previous day in my rice cooker. I then mixed the cooked rice with some peas and a diced carrot and set that in the fridge overnight. When I cooked, I rubbed a pad of butter on the griddle surface, then tossed the rice on, and folded in a pair of fried eggs that had been finely chopped. As it was popping along on a good heat, I added a tablespoon or so of sesame seeds, and some soy sauce with just a little smidge of wasabi paste and sesame oil stirred into it.
If you have better success stories than I do, by all means share them. This has given me fits forever, and I'd love to solve this universal mystery!
Butternut squash soup!
Okay, I'm not a big fan of squash, but all fall I've listened to people rave about butternut this, and butternut that. It's gotten pretty unavoidable, so I figured it's time to confront the issue full on. I wanted to make butternut squash soup, and I wanted it to be awesome. Turned out that it was pretty easy. Butternut squash is the Aston Martin Vanquish of squashes, while regular yellow squash is like the Yugo or the AMC Gremlin of squash. In other words, it's really hard to go wrong.
Here's what I used for my soup:
1 butternut squash
1 medium-sized yellow onion, chopped
1 quart chicken stock
1/4 cup heavy cream
2 tbsp butter
2 tsp salt
1 tsp black pepper
1 tsp rubbed sage
1 tsp cumin powder
1/2 tsp nutmeg
1/2 tsp cayenne pepper
Pinch of cinnamon
1 bay leaf
Preheat the oven to 350 degrees.
Split your butternut squash, and remove the seeds and stringy pulp from the bulb-shaped part. Clean out the stringy stuff and reserve your seeds in a cup of very salty water. You're going to roast them later and make an awesome garnish. Take the butternut halves and put them in the oven, split-side up. Roast those for about 20-30 minutes, or until the flesh is fully tender. Test it with a knife and see if you meet any resistance. If you don't, it's ready. Remove from the oven and let cool. The outer skin should peel off pretty easily with your fingers. Set the flesh aside.
Spread the seeds on a baking dish and put in the oven at the same temp for about ten minutes. Alternatively you can dry-roast them on medium heat in a skillet. The salt water should leave behind a little salt on the seeds.
In a large stock pot, heat your butter to medium, add your onions and salt, and cover, cooking for about five or ten minutes until soft. After that, add the stock, squash, and all spices except the bay leaf, and bring to an energetic boil for about two minutes. After that's done, take it off heat and add cream. Here, you can either put the soup into a blender and liquify it, or if you have an immersion blender, use that to instead. Once it's blended up, put the soup back on for a low simmer, and add your bay leaf, letting it cook for another ten minutes. After that, remove the bay leaf, and ladle into soup bowls. Take the toasted seeds and sprinkle on top for garnish.
I had some crusty bread alongside this, and it was a great comfort food experience. With the holidays coming up, if you're making turkey or ham or another roasted meat, it'll be a nice accompaniment, so keep that in mind.
Subscribe to:
Posts (Atom)